Set Up Website Hosted Email in Gmail
Connect your domain-based email (like info@yourdomain.com) directly to Gmail and manage everything from one inbox.
Step-by-Step Instructions
Step 1: Open Gmail Settings

Click the gear icon in Gmail and go to See all settings.
Step 2: Go to the 'Accounts and Import' Tab

Scroll down to the section labeled Check mail from other accounts and click Add a mail account.
Step 3: Enter your Email Address
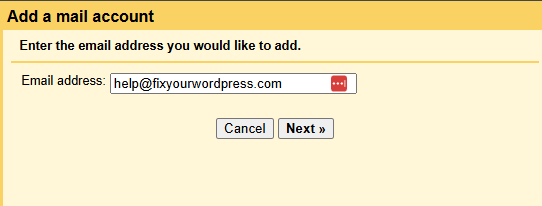
In the pop up window enter your email Web Hosted E-Mail Address. For Example I am setting up help@fixyourwordpress.com. You woud use YOUR email address.
IE johndoe@this-is-my-site.com.
Step 4: Import Previous E-Mails

In the next window choose whether you want to download and import the current and existing E-Mail Accounts emails and folders that may exist in your Webmail Interface.
Step 5: Enter your Email Settings
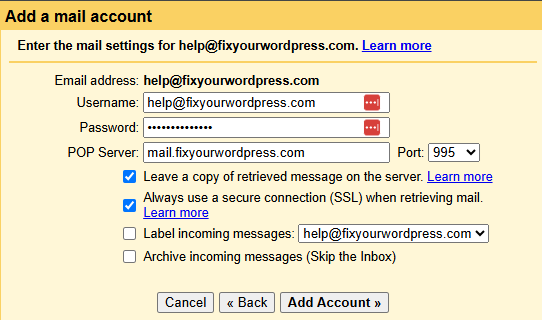
In the Next window enter your Web Hosted E-Mail Account Settings.
If you need help gathering these settings click HERE.
Un-Check OR Check the option to "Leave a copy of received message on the server" (IF you want to) and make sure to check the Always use a Secure Connection (SSL) when retrieving mail Option.
Then click Add Account
Step 6: Settings to Send Mail
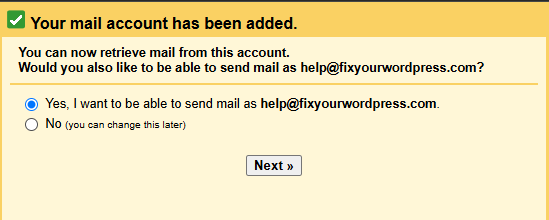
In the Next Window you can choose whether or not you want to send mail from G-Mail on behalf of your Domain Name.
Simply Pick Yes or no
Step 7: Alias or Sending Info
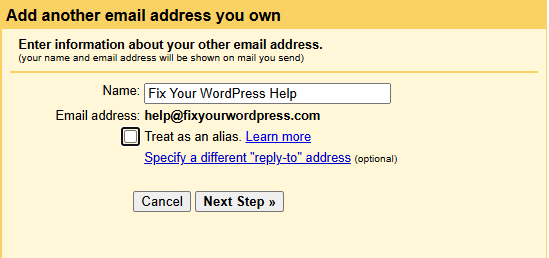
In this Wondow you can choose whether or not you want to treat the email as an Alias or not.
For more information on this click HERE.
Step 8: SMTP Account Info

In this Window you can choose whether or not you want to treat the email as an Alias or not.
For more information on this click HERE.
Step 9: Confirm Sending
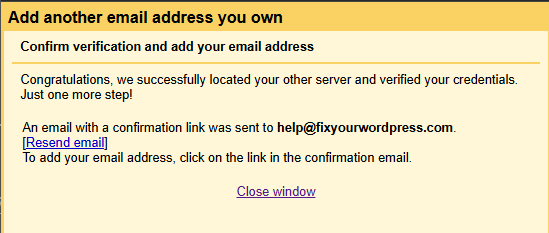
From here you need to check whatever email you set up for a confirmation email from G Mail.
Step 10: The Confirmagtion Email

When you receive this email, simply click the link to confirm you manage/own the email address and authorize sending on behalf of G-Mail Servers
Step 11: Confirmagtion Success
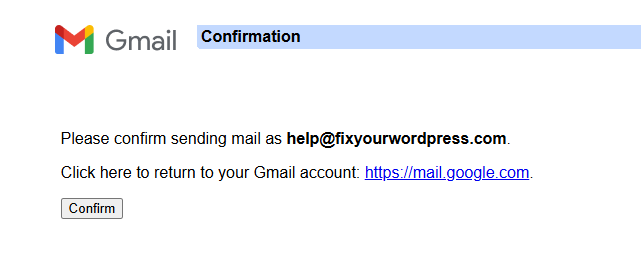
Simply Select Confirm on the G Mail Confirmation Screen
Step 12: All Set
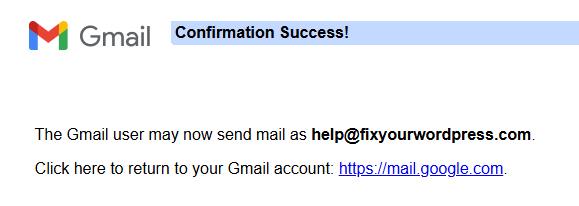
You have now Verified your email address with G Mail and will be able to send email FROM your domains email account when using G-Mail
Step 13: Testing!
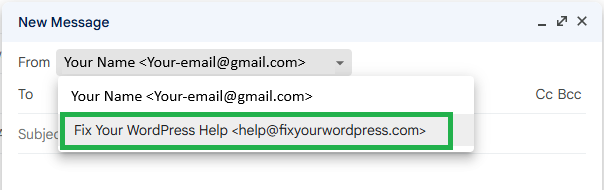
Now that you have the Incoing and Outgoing set up you can test this.
Simply loading your G Mail inbox should result in you seeing some (if not all) of your emial from your domain.
When you compose an email you can also change the FROM field and pick your Domain Specific Email Account.